Shop Now
-
Beads
- Acrylic Shapes
- Bead Boxes and Packs
- Bead Kits
- Clay Beads
- Cloisonne Beads
- Crystal Beads
- Faceted Beads
- Gemstone Beads
- Glass Beads
- Knitted Beads
- Large Hole Beads
- Lava Beads
- Letter Beads
- Metal Beads
- Pearl Beads
- Plastic Beads
- Play Jewels Craft Beads
- Polymer Clay
- Pony Beads
- Shell Beads
- Stone Beads
- Strung
- Style and Grace
- Wooden Beads
- Candle Craft
- Christmas
- Clearance
- Craft Kits
-
Easter
- Basket Filling
- Bonnets
- Clearance
- Critters
- Decorations
- Decorative Eggs
- Embellishments
- Feathers
- Fillable Containers
- Gift Tags
- Glitter
- Moulds and Stencils
- Novelty Hair Accessories
- Novelty Headbands
- Pom Poms and Chenille Sticks
- Resin Embellishments
- Ribbons
- Scatters
- Stickers
- Treat Bags
- Treat Baskets
- Treat Boxes
- Wood Beads and Charms
- Wood Craft
- Felt
- Floral Craft
-
General Craft
- Buttons
- Chenille Sticks
- Craft Foam
- Craft Folley Bells and True Bells
- Craft Glue and Adhesives
- Craft Magnets
- Craft Pom Poms
- Craft Seashells
- Critters
- Embellishments
- Fake Gemstones and Jewels For Crafts
- Feathers
- Foil Flakes
- Glitter
- Haberdashery
- Joggle Eyes
- Magnifying Glasses
- Plastic Tubing Craft
- Play Foam
- Rhinestones
- Sequins and Scatters
- Tassels
- Wooden Coat Hangers
- Hoops and Metal Rings
- Jewellery Making
- Lampshade Craft
- Macrame Supplies
- Packaging and Party
- Resin
- Ribbons
- Stationery
- Stickers and Papercraft
- Stringing and Trims
- Toymaking Supplies
- Velcro
- Wooden Craft
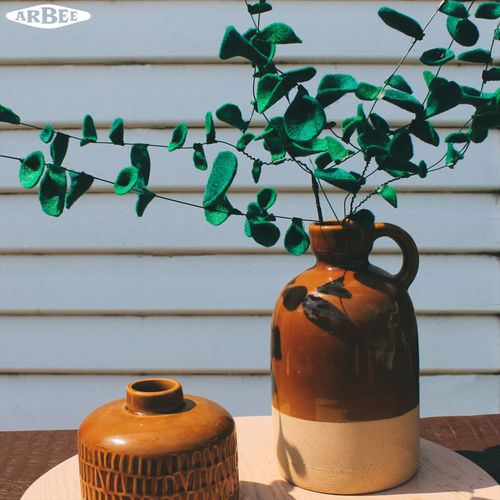
Felt Eucalyptus Project
Date: 06-04-2022
Felt Eucalyptus Instructions
What you’ll need:
- Dark green felt
- Scissors
- Floristry wire & cutters
- Floristry tape
- Hot glue gun & sticks
- Fabric glue (if necessary)
- Green paint (if necessary)
Instructions:
- Create the shape of your eucalyptus using the floristry wire. Bunch some together (around 5-6) and twist the wire at the base, leaving the top ¾ untwisted.
- Branch out the wires to look natural, and trim some where necessary to add different lengths. You can even twist 2 pieces together halfway up to create the effect of a splitting branch.
- Use floristry tape where necessary to secure the branches together.
- Once you have created the base with your floristry wire, you can now start creating the leaves to glue on.
- Cut out some (we did about 30-40) leaf shapes out of the green felt. They should look like this:

- Using your hot glue gun (or fabric glue), place a dot at the point of the leaf, and pinch together, to create a 3D leaf. Do this with all your leaves, apart from the few that will be glued to the ends of the wires, leave these ones unglued and flat. Using scissors, cut the tips of the leaves, so they are a straight line. This will make it easier to glue onto the wires.
- Use the hot glue gun again, and add a dot to the tip of a leaf without glue on it, and pinch this leaf onto the end of one of the branches. Do this with the rest of those leaves.
- With the leaves that have the glue on them, add a dot of glue to the base, and stick to your wire. Glue these in different positions and facing different ways to look more natural.
- Once your glue has dried, remove any strings that are hanging over to make it clean.
- This part is optional, but if your hot glue isn’t drying clear, using some acrylic paint that matches the green of your plant, pain over the glue to hide it.
- Let your plant dry and place it in a vase for decoration.

