Shop Now
-
Beads
- Acrylic Shapes
- Bead Boxes and Packs
- Bead Kits
- Clay Beads
- Cloisonne Beads
- Crystal Beads
- Faceted Beads
- Gemstone Beads
- Glass Beads
- Knitted Beads
- Large Hole Beads
- Lava Beads
- Letter Beads
- Metal Beads
- Pearl Beads
- Plastic Beads
- Play Jewels Craft Beads
- Polymer Clay
- Pony Beads
- Shell Beads
- Stone Beads
- Strung
- Style and Grace
- Wooden Beads
- Candle Craft
- Christmas
- Clearance
- Craft Kits
-
Easter
- Basket Filling
- Bonnets
- Clearance
- Critters
- Decorations
- Decorative Eggs
- Embellishments
- Feathers
- Fillable Containers
- Gift Tags
- Glitter
- Moulds and Stencils
- Novelty Hair Accessories
- Novelty Headbands
- Pom Poms and Chenille Sticks
- Resin Embellishments
- Ribbons
- Scatters
- Stickers
- Treat Bags
- Treat Baskets
- Treat Boxes
- Wood Beads and Charms
- Wood Craft
- Felt
- Floral Craft
-
General Craft
- Buttons
- Chenille Sticks
- Craft Foam
- Craft Folley Bells and True Bells
- Craft Glue and Adhesives
- Craft Magnets
- Craft Pom Poms
- Craft Seashells
- Critters
- Embellishments
- Fake Gemstones and Jewels For Crafts
- Feathers
- Foil Flakes
- Glitter
- Haberdashery
- Joggle Eyes
- Magnifying Glasses
- Plastic Tubing Craft
- Play Foam
- Rhinestones
- Sequins and Scatters
- Tassels
- Wooden Coat Hangers
- Hoops and Metal Rings
- Jewellery Making
- Lampshade Craft
- Macrame Supplies
- Packaging and Party
- Resin
- Ribbons
- Stationery
- Stickers and Papercraft
- Stringing and Trims
- Toymaking Supplies
- Velcro
- Wooden Craft
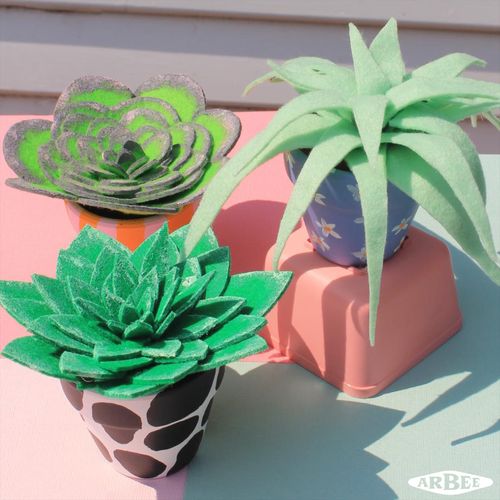
Felt Succulents Project - DIY Home Decor Crafts
Date: 07-04-2022
Felt Succulent Instructions
What you’ll need:
- Green felt in various colours
- Scissors
- Floristry wire & cutters
- Floristry tape (if necessary)
- Acrylic paint and brushes
- Hot glue gun & sticks
Instructions:
- Depending on the size of the planter pots you are using, you may choose to make smaller or bigger succulents.
Dark green succulent
- Cut out a ‘star’ shape with 5 leave points, and make 5 copies, each 1cm smaller than the other.
- Push the larger piece into the planter pot so that it is a ‘cone’ shape. Glue the pieces together with the largest on the bottom and the smallest on top.
- To add some detail in the centre, cut out pointy leaf shapes in various sizes and glue them in the centre.
- Using some light green acrylic pain, paint the borders to add some colour and realism.
Light green succulent
- Use the same ‘star’ shape as the dark green succulent, but don’t make the leaves pointy, keep them rounded.
- Make 5 copies of this shape, with each one getting 1cm smaller again.
- Push the larger piece into the planter pot so that it is ‘cone’ shape. Glue the pieces together with the largest on the bottom and the smallest on top.
- To add some detail in the centre, cut out semi-circle shapes in various heights and sizes, and glue them in the centre.
- Using some purple and pink acrylic paint, paint the borders to add some colour and realism.
Overhanging succulent
- Cut out long triangular pieces in different lengths and widths.
- Once you have your pieces cut, grab your floristry wire and cut these to the same lengths as your leaves, leaving 10-15cm at the base to leave room for bunching together. Hot glue the wire onto your leaves, ensuring the tips are glued on well.
- Once all your leaves have their wires glued on, bunch them together with the wires facing outwards.
- Twist the base wires together or use floristry tape if necessary.
- Start bending the leaves down to create a flowing effect out the centre.
- You might find that bending the base wires outwards 90 degrees, will act as little feet to hold your plant up in its pot.

